When you click on![]() the insert image icon, a window will pop up.
the insert image icon, a window will pop up.
You can include images from the server or from your local machine.
- To add an image already on the server
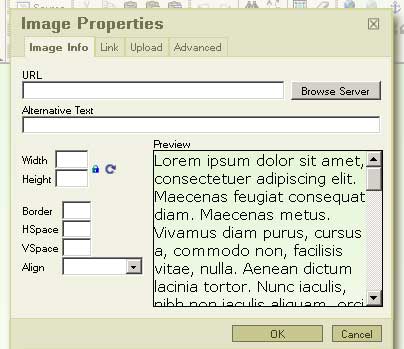
- By default, the “Image info” tab is selected. Use this tab if you want to add an image that is already on the server.
- Click the browse server button
- When FCK editor- Resources Browser pops up, click on the image of a folder at the top
- Click on the image you wish to include
- Add some alternative text to describe the image for people who cannot see it.
- Then click OK in the image properties window. The image will appear in the editor
- To add an image from you own machine
- Click the Upload tab at the top
- Click the browse button
- Select the file you want to upload from your local machine
- Click “open” to accept the file
- When the address appears in the input field, click the “Send it to the server” button
- When you get a message indicating success, click on “OK”.
- The tab will now change to “Image Info”
- Add some alternative text to describe the image for people who cannot see it.
- Then click “OK” in the image properties window. The image will appear in the editor
Note that a more advanced user can get more control over how the image sits within the by inserting a table and placing the image in one table cell and text in another.
- Login to post comments